Showing posts with label DIY. Show all posts

Thursday, June 14, 2012

This and That Ya'll

20120614-130157.jpg

Super Cooper decided to start his summer out right . . .He came down ready to hit the pool looking just like this. . .no kidding. ( Excuse our side door disaster area.) 

20120614-130223.jpg

Scotty & Sadie ended up like that. Family hierarchy is in place.

20120614-130104.jpg

The sunroom/playroom concept board is under way. Blending three spaces into one line of vision isn't as easy as one would think ya'll.

20120614-130111.jpg

Just like that the final details are coming together for our living room. Curtain/trim drama was finally put to rest! One floor lamp and a couple of pillows and project living room vamp will be complete.

20120614-130117.jpg

Stopped by Lucy & Company  long enough to snap a pic of their rock star showroom. This bed is off the chain! Beth is genius like that.

Cheers Ya'll,

Tay

Wednesday, June 6, 2012

All Bohemian Like That: Cooper's Forever Room

20120606-154242.jpg


Forget the "Big Boy" room idea, way to short-lived. . . For Cooper's upgrade from his nursery I decided to go with a theme I know he will love forever or at least until he goes to college. . . Wordly. Vintage. Bohemian.


20120606-150202.jpg


Last year (yes it was that long ago) I fell in love with John Robshaw's Tie Die Coverlet and Shams. So much so,  that I knew I was going to have to start saving some major penny's in order to be able to afford it! Thanks to the lovely lady's at Cottage Chic, I was able to accomplish my most materialistic wants. The blue and white batik pillows were a clearance steal from West Elm. The red geometric bolster from John Robshaw, was not.


To see more of his textiles go to http://www.johnrobshaw.com/


Check out the vintage 70's picture of a three-year old me. On top of the world if I recall. A gift from the artist Hunter Mallory, the picture was mounted and saved for over 30 years. Last year during a studio pow-wow-he pulled it out of the rafters just for me. Tears, I tell you . . .


20120606-150129.jpg


Sometime this Spring my "Mama" took this amazing vintage batik off  of her wall and threw it in my car.  She can be demanding like that when she wants you to have something. . .and as guilty as I felt for taking it, I know Cooper and I will love it forever. Thanks to Corners at Park Road for framing it in the white lacquered modern frame and making it all mine!


To learn more about batik go to http://en.wikipedia.org/wiki/Batik


20120606-150237.jpg


I scored the Indian batik style fabric remnant at Post & Gray in South end for $50.  Next sweet awesome Ruby created the french pleat curtain panels. Kept open they add a touch of class. Even better, when they are shut, look like a fabric wall hanging. I LOVE!


20120606-150319.jpg


Last fall we painted the walls Ellie Gray in Duration Paint from Sherwin William's.  (My favorite true grey)  The lamps were found on sale at West Elm for $69 each. The mirror from Ballard Design used to hang vertically in our Master Bedroom. The mahogany dresser dates back to the  late 1800's from Louisiana. Part of Scotty's bachelor furniture, it is a true antique beauty.


20120606-150403.jpg


Love Ikea for cheap cool storage units that are totally affordable and equally cool! They all end up banged up, so it's better to save the money for the fun stuff!


20120606-154042.jpg


My old friend James left this replica sculpture on my porch as a gift  for my 26th birthday. It has been in my home ever since and I laugh every single time I see it! The french Perrandello/Jeanne Provost vintage theater print is from Alexander Scott and reminds me of Sean Connery. Nothing could be more masculine.


20120606-154212.jpg


Meet Fred the Fish. I found him hanging a long time ago at Tradition's for $45. The owner was like "If I take this down, you can't return it."  Whateve's. . .for that price he had a new forever home. More importantly he was the original inspiration for the room and his newsprint coloring has helped me along the way. Every room has to have a starting point!


20120606-154130.jpg


The wrought iron sleigh bed was my own "big girl" bed and was a gift from my father in High School. Once hunter green, I think it's true calling was Fire Engine Red. . . I had it sprayed high gloss lacquer just to be sure. The linen bed skirt and roman shades were made by Ruby from remnant fabric I found at Post & Gray. The added band and single pleat add structure and balance the bohemian coverlet.


20120606-150445.jpg


Sure hope he still likes it in 15 years.


Cheers,


Tay


Oh and if you follow this blog, you will remember that sweet Ruby was fighting the fight of her life, Breast Cancer. I just heard that she doing great and while cancer is cancer.  . .she has won this battle. . . and I for one am extremely happy about that!! 

Friday, May 25, 2012

Made in the Shade

Love the Grey and Green


Replacing old lamp shades is an easy and affordable way to refresh an old lamp and update a room.  In the room shown above, check out the modern,  large, white barrel drum shades on the traditional brass floor lamps. The tall shades add height and make the lamps appear to pop off of the seagrass wallpaper.

I recently scored this beautiful vintage leucite lamp at Slate Interiors for under $100. The only problem being that it was missing its  shade. Knowing full well I had to have it, I gambled on the fact that I could find one! Hours of internet searching lead me to EveryLampShade.com. http://www.everylampshade.com The name is not a joke,  they really might have every lamp shade under the sun!


*My New Lamp


Here are a couple of my favorites for everyone to enjoy:


Floral Silhouette Giclee Drum Shade 13.5x13.5x10 (Spider)


Floral Blue Silhouette Giclee Drum Shade 13.5x13.5x10 (Spider)The perfect way to add an organic element to an otherwise neutral geometric room. In spa colors and in orange and blue! $74


Gold Drops Canvas Drum Shade 14X14X10 (Spider)


***MY PERSONAL FAVORITE!!!! 


Duck cotton and gold drops make this one my must have piece.$62.99


Stacy Garcia Porthole Giclee Shade 13.5x13.5x10 (Spider)


The perfect addition to a cream porcelain gourd shaped lamp or a glass or leucite lamp. Even more fun, score a flea market find and spray it a fun color and justify spending the money on the shade! $74


Woven Reed Giclee Shade 13.5x13.5x10 (Spider)


Add a refined natural texture to a room without the expense of buying a seagrass rug. This would go with almost any lamp in almost any room. $74.99


Stacy Garcia Circle Medallion Giclee Shade 12x12x8.5 (Spider)


Add a punch of color and some fun to a room with this barrel shade! $64.99


Embroidered Hourglass Lamp Shade 14x14x11 (Spider)


Hollywood Regency shines in the lamp shade. $43.99


Lights Up! Red Mumm Shade 14x16x11 (Spider)


Ok, maybe not so affordable but ever so cool. This eco friendly shade come in at $124.99


Lights Up! Black Mumm Shade 14x16x11 (Spider)


And in Black!


Ivory Linen Drum Cylinder Shade 8x8x11 (Spider) As for my new lamp delimma, this shade in a bigger size might be the perfect option! I love organic texture with the mid-century barrel vibe.


White Cotton Drum Cylinder Shade 8x8x11 (Spider)


Or I may just stick with a clean white. . .


Either way, I sure did have fun searching this site!


The shades shown above are mostly available at different sizes and at different prices. Take a look for yourself!


Cheers,


Tay

Wednesday, April 18, 2012

I've Been Busy: It's Springtime Y'all

Time has just been flying by, and as unfair as that usually seems, we have been having a great time over here. Easter was a smashing success at old Carolina Golf Club. Our "club in the hood" opened up the new outdoor patio and fire pit, hosted an amazing brunch and had so many kids at the Easter Egg Hunt that next year they are going to have to have a serious conversation with the Easter Bunny about Supply and Demand.


20120418-075336.jpg


Scotty and I posed for a rare couples picture and it didn't turn out terrible.


20120418-075346.jpg


Cooper and Sadie got super serious about the Bunny.


20120418-075353.jpg


Sadie's luck shined when she found this 4 leaf clover outside of Kathy's neighbor's house!


20120418-075809.jpg


The lamps finally arrived for our living room makeover  and they are so disco, I die! More to come on that later!


20120418-075421.jpg


Tried my hand at gardening and landscaping last weekend and I think I might love my new hobby!


20120418-075801.jpg


 . . . started the "Get Minty" project, so stay tuned for the final reveal this weekend!


Cheers to you all!!


Tay

Saturday, April 7, 2012

SURPRISE!! Guest Blogger Eleanor Rodway ROCKS it DIY Style!


I am beyond excited to introduce my friend Eleanor Hains Rodway. Eleanor is an over all creative master mind and the writer/ blogger for TahTah makeup.

She is über wife  to handsome Jamie and loving Mama to sweet baby Max. Oh and yes, I enter into evidence, that indeed a girl can have it all. . . my girl E is the real PIMPIN deal!

Hi everyone!  It's so nice to be here!  Thanks to @sweethomecharlotte for inviting me over to play.  Blogging about make-up is an absolute blast but once in a while I like to break away from the norm and change things up. I must preface this with the disclaimer that I am in no way an expert designer.  I seek most of my designing advice from @sweethomecharlotte.  She tolerates my questions and always helps me make decisions.  I love a project though.  Big or small I'm always excited to tackle something new.  I don't always get the most desired result but every once in a while I pull out a winner.  This my friends was a winner.

It started with a lone fabric swatch from Tony's in Huntersville.  If you haven't been there you need to go - loads of fabric all on the cheap.

Anyways - fabric swatch inspiration
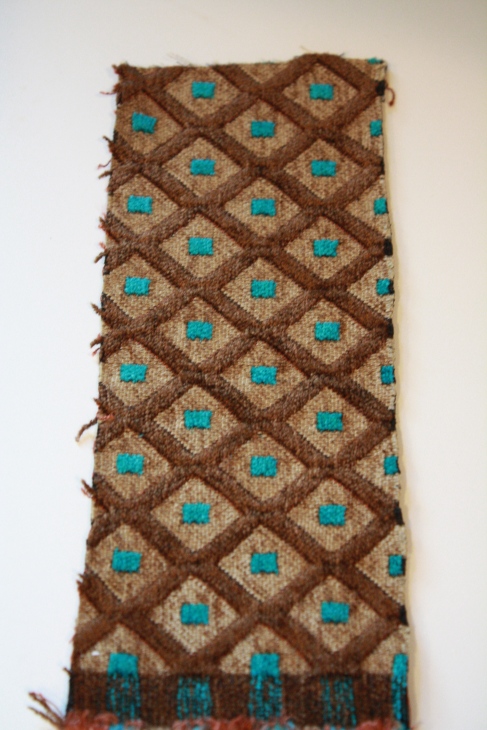
Image

I decided  to use it to recover my dining room chairs.  My dining room and living room are a combo area.  I've been wanting to do a little upgrade to the space for a while now.

I didn't want to can't spend a ton of money for three reasons
(1) We've got some really nice leather chairs that we paid a premium for - I basically blew an entire room house budget on those things
(2) We have some nice family heirloom pieces in the room that are OFF LIMITS when it comes to moving, painting etc.
(3) My husband would kill me if I spent more money on furniture.

So trying to keep it simple and cheap I aim to put lipstick on the proverbial pig (totally kidding I LOVE my living room space)

But a little fabric and paint goes a long way.  So with my reuphosltery project on the to do list....progress shown below


Errr moving right along aren't we?

I'm a tornado when it comes to DIY I like to plan and then do it ALL at once so I needed more on my living room updo to do list (can you say that three times fast?)

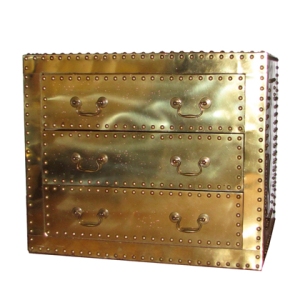
I opted for a side table project.  I've been wanting a new side table to go in between the two leather chairs.  I was thinking old Hollywood glam, maybe a brass nailhead trim table or something like this

[caption id="attachment_1116" align="aligncenter" width="300" caption="Click for Photo Credit"][/caption]

Please refer to reason 3 from above as to why this never happened.

So I went to plan B.  I discovered this website on one of my design blogs not to long ago - www.myoverlays.com   Upon my discovery I realized that I could do a fancy side table at a fraction of the cost thanks to the overlays and thus a new project was born.

I started with the Ikea Rast side table

These things are super cheap at Ikea - $34.99.  They aren't solid oak or anything but I would say fairly sturdy.  I mean ultimately you get what you pay for at Ikea but again it wasn't being held together by glue.  A good solid accent piece in my opinion. So to begin with I primed both the drawers and the actual piece.
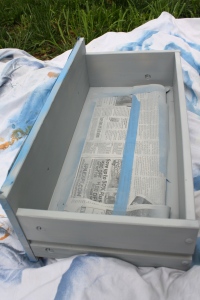


I covered the front and the inside of the drawers with newspaper and then primed them in a grey primer and spray painted them gold.  This way when you open them up the sides are gold and the inside is gold.  My plan is with the leftover fabric from the chairs to line the inside of the drawers with it. Choosing a color was the hard part.  I'd taken the fabric swatch to Lowe's to have them try and match it.  Then I tried to pick colors just eyeballing the fabric
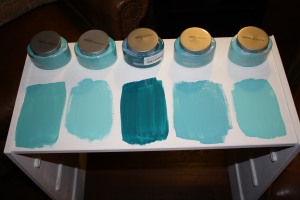


The dark one in the dead center is what Lowe's pulled from the swatch.  I think it's pretty funny how my "eyeballing" didn't even come close to what Lowe's pulled.  Although in my defense the browns from the fabric pulled through on the custom color hence it being so dark.  It ended up working out perfectly because we have dark furniture. So we chose the custom color. Completed drawer with spray painted inside and front looks like so


Sorry the picture is a wee bit dark.  Mad Max rarely lets me get stuff accomplished in the daylight hours.

Next I painted the overlays that I purchased.  I spray painted them gold as well.  This part was super easy.  They are very light weight but not so light weight that they fly around when you're painting them.
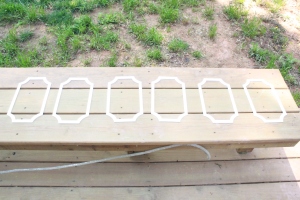


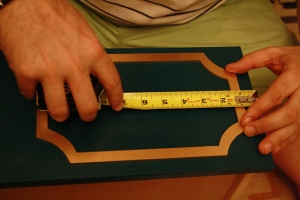
Then came the worst part of all - making sure these suckers lined up EXACTLY.  I asked told my husband he needed to help me as it really was a two person job.
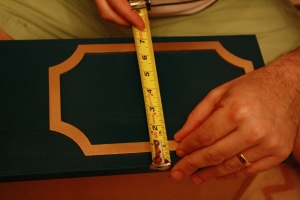


Once we'd gotten them lined up perfectly I marked the drawer while the husband held them in place.  Then smeared a little Liquid Nails on the back and stuck it on.

Adding the hardware was the last step.  I headed over to Blackhawk with the exact picture in mind of what I wanted.

I ended up with these


Pretty much what I wanted - the glass looking knobs.  These are acrylic so pretty close.  My only complaint - I wanted a brass or gold base but all they had was silver - or I should say all they had in my price range was silver.  They had crystal and glass knobs both with gold or brass bases but the crystal knobs at $23 a pop and the glass knobs at $16 a pop....

Well let's just say I made an executive decision and went with silver and acrylic for $4.

Truthfully I refused to spend $150 on hardware for an Ikea piece and if you once again reference Reason 3 from above it's totally applicable in hardware purchases as well.

And so alas my DIY project was done.  Wait for it......

Drumroll please!

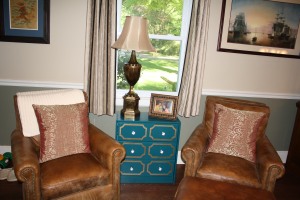
TA-DA!
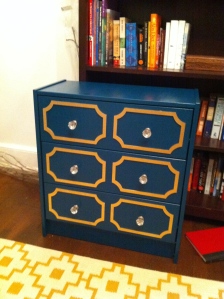


Not too shabby eh?

Breaking it down

Ikea Rast Chest →  $34.99
Paint Samples / Spray Paint  →   $18.00
Quart of custom Paint →  $21.00
6 Anne Overlays  → $58.60
Hardware  →  $28.89

That's a total of $161.48!  I would say I truly deserve a cookie on this one.  All the pieces I had my eye on were well over $500 and that was before shipping.

I mean I think it looks like a million bucks!

Here's a little before and after
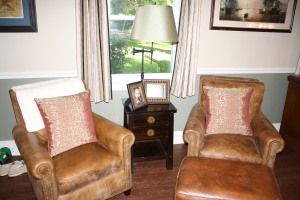


Thanks for having me @sweethomecharlotte!

Now we must discuss a new lamp shade and throw pillow options - I need your opinion :)